Blogger.. Go Social..

If you want more people to see your blog,
there are many ways than before.
world has gone social.
with the arrival of Facebook, twitter,and Google plus Social networking sites, things got much easier than ever.

Read Article →

Setup Open graph for blogger effectively

What is open graph?

Definition for opengraph(from wiki):
The Open Graph protocol enables developers to integrate their pages into the social graph. These pages gain the functionality of other graph objects including profile links and stream updates for connected users.The implications that the Open Graph may have on the web as a whole relate significantly to the idea of search engines. While currently Google still attracts more traffic than any other website, Facebook is a close second. Even without a good internal search engine, Facebook already drives more traffic for some searches, specifically social searches, than Google itself.And in attempting to link Facebook with the rest of the web, the Open Graph is creating Face book's own extensive and highly interactive version of a search engine. Web pages are turned into Open Graph Objects by adding metadata.
As you may already know, there are already meta tags that defines our content, title, description, keyword, and so on. then why opengraph meta tags?
as facebook being the fastest growing social community, we have  to look at it, and keep our standards to go with the current trends.
open graph is applied everywhere today. in many websites, and in their product pages, in articles, everywhere!
When it get shared, it can visible like a story in facebook timeline and news feed with the details , pictures and content types what the user have shared.

Blogger doesn't automatically create opengraph tag for your blog. maybe that may happen in feature.. but blogger does generate standard meta tags for each blog this time when i write this article,if we include below line in our blog's head.

<b:include data='blog' name='all-head-content'/>

Now , we have to tweak our blogger template to generate opengraph tags for each page.
Before that you should be knowing,

Why is it important?

You may thinking why is it important to add opengraph because there are already meta tags  which define our description, title, keyword etc.
so here is answer for your question.
Assume you own a blogger blog. and you have many articles, pages,and products in your blog.
and you also have a share button ,like button, or a comment plugin that you obtained from facebook.
Someone share your article.
it Shows on their timeline and other friend's feed.
if you have no opengraph meta tag assigned, it will likely jut an writing that make no attraction and just a url.
and When a user likes your article, it will show as a url.
Here we need to apply opengraph tags.
What if someone sees a story in feed, someone have something, followed by a link and article picture, and a small description with it? yes. he will be attracted, and his moue cursor moves to that, and click the story.

How can you set up opengraph in your blog effectively?

You will be surprised if you come to know the full features blogger gives to a blogger.(if you understand the full feature)
we can automate the process of generating opengraph tags for each and every post in our blog, each page in our blog, or in the very homepage of our blog. we can do it all once and we have option to do that in simple.
This is how you can setup opengraph for blogger.

Here is Open graph tags for blogger.
Just put this between your <head>` and `</head> tags.

    <b:if cond='data:blog.pageType == &quot;item&quot;'>
        <meta content='article' property='og:type'/>
        <meta expr:content='data:blog.title' property='og:site_name'/>
        <meta expr:content='data:blog.pageName' property='og:title'/>
        <b:if cond='data:blog.postImageThumbnailUrl'>
            <meta expr:content='data:blog.postImageThumbnailUrl' property='og:image'/>
        </b:if>
    <b:else/>
        <meta expr:content='data:blog.title' property='og:title'/>
        <meta content='website' property='og:type'/>
    </b:if>
    <meta expr:content='&quot;en_US&quot;' property='og:locale'/>
    <meta expr:content='data:blog.canonicalUrl' property='og:url'/>


Remember, og:image will only shown if your post contains an image.
Or if you want to show your site logo here if there is no picture in post, you could call an alternate og:image that contains your logo!
Just after all meta tags in your template add below code.
<meta expr:content='http://URL_TO_LOGO.jpg' property='og:image'/>' 

Replace URL_TO_LOGO with the URL to your logo or the default image that to be shown.

Troubleshooting

After done with above code, try to share any of your blog' page .
if you don't know how,below is the way to share a webpage in Facebook.

If you are not able to see any change after adding above code to your blogger template,
Go to  https://developers.facebook.com/tools/debug
and type your URL to post, in the field and click on debug, it will refresh cache in Facebook and will reload your post detail from scratch.

Its a pleasing thing that to hear from you about this article. ;)
Recommended link : http://ogp.me

Read Article →

Facebook comments and like count problem in blogger blogspot - Solved


After blogger started applying Country Redirection in blogs, it is being a problem that Facebook comments and likes are not working properly because each visitor gets different result depends on current blog address. for example, my blog address is http://aslamise.blogspot.com , and when i visit that blog, it becomes http://aslamise.blogspot.in , because i visit from India , this is called country specified redirection.

BUT, we can overcome this problem of Facebook comments or like count problem or any other problem which caused by the redirection, by setting data:blog canonical URL in Facebook plugins

The solution is to tweak your plugin's code and relace data:blog.Url with data:blog.canonicalUrl .
So that it will always point to .com version of your blog.

Here is the Facebook comment plugin code many blogger users,

<b:if cond='data:blog.pageType == &quot;item&quot;'>
<div class='fb-comments' data-num-posts='20' data-width='610px' expr:data-href='data:blog.Url'/>
</b:if>


Perfect one is below one.

<b:if cond='data:blog.pageType == &quot;item&quot;'>
<div class='fb-comments' data-num-posts='20' data-width='610px' expr:data-href='data:blog.canonicalUrl'/>
</b:if>


We Change  the expr:data-href='data:blog.Url' to expr:data-href='data:blog.canonicalUrl'

Facebook like plugin also need this to Work perfectly in blogger blog.

Enjoy blogging. if you have any doubts , feel free to ask in comments.

Or

If you want to know how to replace blogger comments with Facebook comments plugin, Go here


Read Article →

How to replace Blogger Comments with facebook Comment plugin In blog/website

Here is how you can replace blogger comments with Facebook Comments in blogger blogspot.


Before Proceed further, please note that
If you use Facebook comments instead of blogger comments,
  • You will not get email notifications when someone comment on your post.
  • You will not be able to track spam messages in comments with blogger service.
  • Comments you will receive, will not be added to your blog's comments section, but only in Facebook's iframe.

Still,If you want to use this, here we go.

First Step:

First step is to make an app in Facebook.
You should be an app developer to use Facebook comments in your website or blog or wherever you want.

To create a facebook app,
Go to below address.
https://developers.facebook.com/apps
If you are not yet a developer, register for a developer account.

Click on the button named "Create New app"

It will pop up a box. type your app name there. whatever it is. you can also name it as your blogs name.


Click next button, it will ask you to type captcha as Facebook requires that to prevent spamming.

Your app will be created and you will be taken  to a new page where you can see basic settings of your app.


Display name will be the same name you typed.
Now , type blogspot.com,blogspot.[your country specified domain extension.  example:if you are in India it will be blogspot.in].
You can complete the domain name list with country specified domain  extensions as possible.

Next, you can see a field named sandbox mode.

If Sandbox mode enabled, only developers can use the app. so disable sandbox mode. for that check the radio button named "disabled"

Now, come down and click on website with Facebook login, and fill it with http://yourblogname.blogspot.com

Mine will be http://aslamise.blogspot.com

Now click on save

You have just made your Facebook app to use Facebook's plugins.

Second Step:

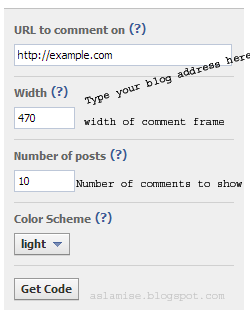
Get code for Facebook Comments

Go to
http://developers.facebook.com/docs/reference/plugins/comments/


Grab your code from there.

<div id="fb-root"></div>
<script>(function(d, s, id) {
  var js, fjs = d.getElementsByTagName(s)[0];
  if (d.getElementById(id)) return;
  js = d.createElement(s); js.id = id;
  js.src = "//connect.facebook.net/en_US/all.js#xfbml=1&appId=YOUR_APP_ID";
  fjs.parentNode.insertBefore(js, fjs);
}(document, 'script', 'facebook-jssdk'));</script>

You have to XML encode code between script blocks to get it work on blogger,else it will show an error.
After XML encoded ,It will look like below.


<div id="fb-root"></div>
<script>
(function(d, s, id) {
  var js, fjs = d.getElementsByTagName(s)[0];
  if (d.getElementById(id)) return;
  js = d.createElement(s); js.id = id;
  js.src = &quot;//connect.facebook.net/en_US/all.js#xfbml=1&amp;appId=YOUR_APP_ID&quot;;
  fjs.parentNode.insertBefore(js, fjs);
}(document, &#39;script&#39;, &#39;facebook-jssdk&#39;));
</script>


(You can just copy paste this to your template just after the <body> tag and replace YOUR_APP_ID with your app id of the app you created.)

Save your template for now.
Now click Ctrl+F and search <b:includable id='postQuickEdit' var='post'>
Just before that you can see </b:includable>.
Now lets call our comment plugin here.

So Copy paste this just before that </b:includable>.


        <b:if cond='data:blog.pageType == &quot;item&quot;'>
<div class='fb-comments' data-num-posts='20' data-width='610px' expr:data-href='data:blog.canonicalUrl'/>
        </b:if>


Change the width of comment box as per your template's width.

Add <meta content='YOUR-FACEBOOK-ID' property='fb:admins'/> between your  <head></head> tags. So we can moderate comments in our blog.
We have just enabled Facebook comments plugin in your blog.

Now, the last step. 
we have to hide the real blogger comments plugin from our blog.

for that, go to your blog's dashboard.

Settings -> Posts and comments ->

Under Comments Section, you can see an option named Comments Location

Select Hide.

Note: Selecting Hide does not delete existing comments.

Then click save settings.


You have just replaced  your blog's default comment system with Facebook's comment system.
Feel free to ask if you are experiencing any problem with the process. your comments are always welcome :)


Read Article →

How to Switch back to blogger profile from Google plus profile - easy way


How to Switch back to blogger profile from Google plus profile

If you are using Blogger service to blog,you will have noticed that there are two profile options available for a blogger
one is blogger profile and another is Google plus profile related to your email account that you used to create blogs with.

so, How to Revert from Google plus profile to limited blogger profile where only your name  and picture(picture if available) shows. and another blogs you have(You can always hide  unwanted blogs from appearing in its settings)

To revert from Google plus profile to blogger profile ,Follow instructions below. 

In blogger/home page , click on settings icon that is located on right side of the page next to language drop down and select 'Revert to Blogger profile' option.

OR

Simply Go to below URL

http://www.blogger.com/revert-profile.g
Here we go. you can see a button named as 'Switch to a limited blogger profile.'

If You're currently using a Google+ profile on your blogs,drawback of changing to blogger profile from Google plus profile is, links to your blogs from the About tab of your Google+ profile will also be removed.(IT will affect SEO [authorship meta tag]).

If you switch to a limited Blogger profile, you will be asked to confirm your settings on the next page

Don't click on cancel, just proceed, click on switch to a limited blogger profile button.

It will take you to the confirmation page.
Address will be something like this

http://www.blogger.com/switch-profile.g?continue=/home?profileSwitch%3Dreverted&default_profile=profile-blogger&choose_profile&switchProfileSource=7

The profile that readers will see when they view your posts is shown below. Using a Google+ Profile gives you an identity on Google properties and connects you with your readers, allowing them to share and recommend your content on the web and on Google+. If you want to use another identity such as a pseudonym, you may choose a limited Blogger Profile instead. There will be a section titled as "You will be seen as...".

Display Name [----]

Type your name for your blogger limited profile

Click continue to blogger 


You have just converted from Google plus profile to limited blogger profile.

Feel free to start a discussion in comments

Read Article →

How to set Google plus language to my language. [SOLVED]


You can change from one language from another in google plus in just a click!!

After messing with many threads in internet and following their instructions, i found that it is much complicated for beginners ,especially from mobile users. Today, my friend asked me whether it can be done simple without much affort in mobile, he wanted to change from arabic language to english.
and was using opera to browse in mobile.

what i found is actually surpricing for me, i had noticed that google include their interface language in search URL s. like hl=en or hl=ml, like that.
So i gave it a try. YES! It Worked!

Here is the final and ultimate answer! simplest too !

Click to see google plus in English 
http://plus.google.com/?hl=en

Click to see google plus in Arabic
http://plus.google.com/?hl=ar

Click to see google plus in Malayalam
http://plus.google.com/?hl=ml

Click to see google plus in Hindi 
http://plus.google.com/?hl=hi

Click to see google plus in Bengali 
http://plus.google.com/?hl=be

Click to see google plus in Telugu 
http://plus.google.com/?hl=te

Click to see google plus in Marathi 
http://plus.google.com/?hl=mr

Click to see google plus in Tamil 
http://plus.google.com/?hl=ta

Click to see google plus in Gujarati 
http://plus.google.com/?hl=gu

Click to see google plus in Kannada 
http://plus.google.com/?hl=kn

Click to see google plus in Punjabi 
http://plus.google.com/?hl=pa


Click to see google plus in Deutsch http://plus.google.com/?hl=de

Click to see google plus in Español
http://plus.google.com/?hl=es

Click to see google plus in Français
http://plus.google.com/?hl=fr 

Click to see google plus in Italiano
http://plus.google.com/?hl=it

Click to see google plus in Nederlands lng
http://plus.google.com/?hl=nl 

Click to see google plus in Polski
http://plus.google.com/?hl=pl

Click to see google plus in Português (Brasil)‎
http://plus.google.com/?hl=br

Click to see google plus in Русский
http://plus.google.com/?hl=ru  

Click to see google plus in Türkçe
http://plus.google.com/?hl=tr


If you want to see google plus in other languages than this , just replace the last two letters with your language's letters.

Read Article →