Simple Tutorial: How to use jQuery&CSS to show or hide tab contents without page jump

While making elements in your website or blog 'beautiful and easy to navigate', you will have to adjust elements in an order.
 Here we going to lean how to set up a navigation system which shows single section's content at a time as per user condition and where a group of multiple sections exist,without page jump.
just like the example below.


Contents in tab 1 section
Contents in tab 2 section
Contents in tab 3 section


So here we go. Hope you have understanding of jQuery, CSS,and HTML.
 First, lets make our navigation menu for calling tabs.
  <div> <ul class="nav nav-tabs"> <li class="active"> <a href="#tab1">tab 1</a> </li> <li> <a href="#tab2">tab 2</a> </li> <li> <a href="#tab3">tab 3</a> </li> </ul> </div> 

Then next to that, lets setup our sections where each section will have id like tab1,tab2,tab3 in this order.
  <section id='tab1' class="tab-content active"> Contents in tab 1 section </section> <section id='tab2' class="tab-content hide"> Contents in tab 2 section </section> <section id='tab3' class="tab-content hide"> Contents in tab 3 section </section> 

Now, lets style our navigation menu and sections with CSS
  <style type='text/css'> .nav { margin-bottom: 18px; margin-left: 0; list-style: none; } .nav > li > a { display: block; } .nav-tabs{ *zoom: 1; } .nav-tabs:before, .nav-tabs:after { display: table; content: ""; } .nav-tabs:after { clear: both; } .nav-tabs > li { float: left; } .nav-tabs > li > a { padding-right: 12px; padding-left: 12px; margin-right: 2px; line-height: 14px; } .nav-tabs { border-bottom: 1px solid #ddd; } .nav-tabs > li { margin-bottom: -1px; } .nav-tabs > li > a { padding-top: 8px; padding-bottom: 8px; line-height: 18px; border: 1px solid transparent; -webkit-border-radius: 4px 4px 0 0; -moz-border-radius: 4px 4px 0 0; border-radius: 4px 4px 0 0; } .nav-tabs > li > a:hover { border-color: #eeeeee #eeeeee #dddddd; } .nav-tabs > .active > a, .nav-tabs > .active > a:hover { color: #555555; cursor: default; background-color: #ffffff; border: 1px solid #ddd; border-bottom-color: transparent; } li { line-height: 18px; } .tab-content.active{ display: block; } .tab-content.hide{ display: none; } </style> 

Next, we need to Call jQuery, if you have already called jQuery in your document, then skip this step.
  <script type='text/javascript' src='//code.jquery.com/jquery-1.8.3.js'></script> 

Now, the last step, We have to display our tab2 section when we click on it. same time we have to hide the other tabs. 
 Our jQuery code is below

  <script type='text/javascript'> $(document).ready(function() { $('.nav-tabs > li > a').click(function(event){ event.preventDefault();//stop browser to take action for clicked anchor //get displaying tab content jQuery selector var active_tab_selector = $('.nav-tabs > li.active > a').attr('href'); //find actived navigation and remove 'active' css var actived_nav = $('.nav-tabs > li.active'); actived_nav.removeClass('active'); //add 'active' css into clicked navigation $(this).parents('li').addClass('active'); //hide displaying tab content $(active_tab_selector).removeClass('active'); $(active_tab_selector).addClass('hide'); //show target tab content var target_tab_selector = $(this).attr('href'); $(target_tab_selector).removeClass('hide'); $(target_tab_selector).addClass('active'); }); }); </script> 

We are done! Go play with it. 
 Here is a sample demo you can play with ! 
http://jsfiddle.net/Aslamise/Qt7jx/

Read Article →

Beautiful jQuery tooltip


  • Tool-tips are title of the element which displays when a user hover on same element.
  • There are many plugins available to make tool-tips more beautiful but i prefer this one because it can be customized as we wish and it is compatible with almost all major web browsers.
  • What tool-tip plugins do is , Calling the title attribute's value and displays it on the customized html design.
  • jQuery tooltipster is highly customization enabled plugin. in this article, i have also covered something that will be helpful to change the direction of tool-tip arrow just by assigning class than the default one's.
  • we can use tool-tip on top the element, right side of the element,left side of the element,top left side of the element,top right side of the element,or bottom,bottom right or bottom left of the element.
  • all you have to do is just add this to your website or blog and to assign the needed class to element which has a title attribute with some value in it.

  • Here is a live demo that you can understand how this plugin works.
     To add this beautiful jQuery tool-tip plugin to your blog or website, follow instructions below.
    1Call style-sheet or internal style block between <head></head> tags. <link rel="stylesheet" type="text/css" href="path-to/css/tooltipster.css" /> OR   <style type='text/css'> .tooltipster-chocolate { background-color: #7f5d3c; border: 2px solid #5c3d1f; color: #fafaeb; font-family: Arial, sans-serif; font-size: 12px; line-height: 12px; position: absolute; padding: 10px; border-radius: 4px; text-align: center; z-index: 9999999; pointer-events: none; width: auto; overflow: visible; } .tooltipster-chocolate .tooltip-arrow { text-shadow: 0px 2px 0px #654728, 1px 1px 0px #654728, -1px 1px 0px #654728; } .tooltipster-clean-cut { background-color: #f9f9f9; border: 1px solid #dadada; box-shadow: inset 0px 1px 0px #fff; color: #595959; font-family: Arial, sans-serif; font-size: 12px; line-height: 12px; position: absolute; padding: 10px; border-radius: 4px; text-align: center; z-index: 9999999; pointer-events: none; width: auto; overflow: visible; } .tooltipster-clean-cut .tooltip-arrow { text-shadow: 0px 2px 0px #dadada, 0px 1px 0px #dadada; } .tooltipster-smoke { background-color: #111; border: 2px solid black; border-radius: 6px; box-shadow: 5px 5px 7px #444; opacity: 0.7; filter: progid:DXImageTransform.Microsoft.Alpha(opacity=70); color: white; font-family: Arial, sans-serif; font-weight: bold; font-size: 12px; line-height: 12px; position: absolute; padding: 10px; text-align: center; z-index: 9999999; pointer-events: none; width: auto; overflow: visible; } .tooltipster-smoke .tooltip-arrow { text-shadow: 5px 5px 7px #444; } /* This is the default styling for all Tooltipsters: */ .tooltip-message { background: #000; /* <- for IE */ background: rgba(0,0,0,0.9); color: #fff; font-family: Arial, sans-serif; font-size: 12px; line-height: 12px; position: absolute; padding: 10px; border-radius: 2px; text-align: center; z-index: 9999999; pointer-events: none; width: auto; overflow: visible; word-wrap:break-word; } /* When you want to create a second class for your Tooltipster messages, copy (or modify) this template and add your style to it. Don't forget to refer to it in your Tooltipster settings (tooltipClass: '.my-custom-theme') */ .my-custom-theme { position: absolute; text-align: center; z-index: 9999999; pointer-events: none; width: auto; /* Start styling here... */ } /* Add a slight border radius to all images inside the Tooltipsters */ .tooltip-message img { border-radius: 2px; } /* These next classes handle the styles for the little arrow attached to the tooltip. If you need to change the color of the arrow to match a custom Tooltipster theme, set it in your Tooltipster settings (arrowColor: '#yourcolor') */ .tooltip-arrow { display: block; text-align: center; font-size: 12px; line-height: 12px; width: 100%; height: 5px; position: absolute; left: 0px; z-index: -1; } .tooltip-arrow-top { bottom: -3px; margin: 0 auto; text-align: center; } .tooltip-arrow-top-right { bottom: -3px; margin-left: -10px; text-align: right; } .tooltip-arrow-top-left { bottom: -3px; margin-left: 10px; text-align: left; } .tooltip-arrow-bottom { top: -10px; margin: 0 auto; text-align: center; } .tooltip-arrow-bottom-right { top: -10px; margin-left: -10px; text-align: right; } .tooltip-arrow-bottom-left { top: -10px; margin-left: 10px; text-align: left; } .tooltip-arrow-left { top: 0px; right: -18px; margin: 0 auto; text-align: right; } .tooltip-arrow-right { top: 0px; left: -8px; margin: 0 auto; text-align: left; } /* Some styling to enable the slide animation */ .tooltip-slide { height: 0px; position: absolute; width: auto; z-index: 9999999; overflow: hidden; } </style> 
    2Add jQuery. if you have already called jQuery before, skip this step
      &lt;script type=&quot;text/javascript&quot; src=&quot;http://code.jquery.com/jquery-1.8.0.min.js&quot;&gt;&lt;/script&gt; 
    3 Call External jQuery plugin script or insert code block between <head></head> tags.
    <script type="text/javascript" src="http://aslamise.googlecode.com/files/jquery.tooltipster.min.js"></script>
    OR
    <script type='text/javascript'>//<![CDATA[ $(window).load(function(){ (function( $ ) { $.fn.tooltipster = function( options ) { var settings = $.extend({ animation: 'fade', arrow: true, arrowColor: '', delay: 200, fixedWidth: 0, followMouse: false, offsetX: 0, offsetY: 0, overrideText: '', position: 'top', speed: 100, timer: 0, tooltipTheme: '.tooltip-message' }, options); function animateOut(tooltipToKill) { if(settings.animation == 'slide') { $(tooltipToKill).slideUp(settings.speed, function() { $(tooltipToKill).remove(); $("body").css("overflow-x", "auto"); }); } else { $(tooltipToKill).fadeOut(settings.speed, function() { $(tooltipToKill).remove(); $("body").css("overflow-x", "auto"); }); } } return this.hover(function() { if ($(settings.tooltipTheme).not('.tooltip-kill').length == 1) { animateOut($(settings.tooltipTheme).not('.tooltip-kill')); $(settings.tooltipTheme).not('.tooltip-kill').addClass('tooltip-kill'); } $("body").css("overflow-x", "hidden"); var tooltip_text = $(this).attr('title'); $(this).attr('title', ''); $(this).data('title', tooltip_text); if($.trim(settings.overrideText).length > 0) { var tooltip_text = settings.overrideText; } if(settings.fixedWidth > 0) { var fixedWidth = ' style="width:'+ settings.fixedWidth +'px;"'; } else { var fixedWidth = ''; } $('<div class="'+ settings.tooltipTheme.replace('.','') +'"'+ fixedWidth +'><div class="tooltip-message-content">'+tooltip_text+'</div></div>').appendTo('body').hide(); if (settings.followMouse == false) { var window_width = $(window).width(); var container_width = $(this).outerWidth(false); var container_height = $(this).outerHeight(false); var tooltip_width = $(settings.tooltipTheme).not('.tooltip-kill').outerWidth(false); var tooltip_height = $(settings.tooltipTheme).not('.tooltip-kill').outerHeight(false); var offset = $(this).offset(); if(settings.fixedWidth == 0) { $(settings.tooltipTheme).not('.tooltip-kill').css({ 'width': tooltip_width + 'px', 'padding-left': '0px', 'padding-right': '0px' }); } function dont_go_off_screen() { var window_left = $(window).scrollLeft(); if((my_left - window_left) < 0) { var arrow_reposition = my_left - window_left; my_left = window_left; $(settings.tooltipTheme).not('.tooltip-kill').data('arrow-reposition', arrow_reposition); } if (((my_left + tooltip_width) - window_left) > window_width) { var arrow_reposition = my_left - ((window_width + window_left) - tooltip_width); my_left = (window_width + window_left) - tooltip_width; $(settings.tooltipTheme).not('.tooltip-kill').data('arrow-reposition', arrow_reposition); } } if(settings.position == 'top') { var left_difference = (offset.left + tooltip_width) - (offset.left + $(this).outerWidth(false)); var my_left = (offset.left + settings.offsetX) - (left_difference / 2); var my_top = (offset.top - tooltip_height) - settings.offsetY - 10; dont_go_off_screen(); if((offset.top - tooltip_height - settings.offsetY - 11) < 0) { var my_top = 0; } } if(settings.position == 'top-left') { var my_left = offset.left + settings.offsetX; var my_top = (offset.top - tooltip_height) - settings.offsetY - 10; dont_go_off_screen(); } if(settings.position == 'top-right') { var my_left = (offset.left + container_width + settings.offsetX) - tooltip_width; var my_top = (offset.top - tooltip_height) - settings.offsetY - 10; dont_go_off_screen(); } if(settings.position == 'bottom') { var left_difference = (offset.left + tooltip_width + settings.offsetX) - (offset.left + $(this).outerWidth(false)); var my_left = offset.left - (left_difference / 2); var my_top = (offset.top + container_height) + settings.offsetY + 10; dont_go_off_screen(); } if(settings.position == 'bottom-left') { var my_left = offset.left + settings.offsetX; var my_top = (offset.top + container_height) + settings.offsetY + 10; dont_go_off_screen(); } if(settings.position == 'bottom-right') { var my_left = (offset.left + container_width + settings.offsetX) - tooltip_width; var my_top = (offset.top + container_height) + settings.offsetY + 10; dont_go_off_screen(); } if(settings.position == 'left') { var my_left = offset.left - settings.offsetX - tooltip_width - 10; var my_left_mirror = offset.left + settings.offsetX + container_width + 10; var top_difference = (offset.top + tooltip_height + settings.offsetY) - (offset.top + $(this).outerHeight(false)); var my_top = offset.top - (top_difference / 2); if((my_left < 0) && ((my_left_mirror + tooltip_width) > window_width)) { my_left = my_left + tooltip_width; } if(my_left < 0) { var my_left = offset.left + settings.offsetX + container_width + 10; $(settings.tooltipTheme).not('.tooltip-kill').data('arrow-reposition', 'left'); } } if(settings.position == 'right') { var my_left = offset.left + settings.offsetX + container_width + 10; var my_left_mirror = offset.left - settings.offsetX - tooltip_width - 10; var top_difference = (offset.top + tooltip_height + settings.offsetY) - (offset.top + $(this).outerHeight(false)); var my_top = offset.top - (top_difference / 2); if(((my_left + tooltip_width) > window_width) && (my_left_mirror < 0)) { my_left = window_width - tooltip_width; } if((my_left + tooltip_width) > window_width) { my_left = offset.left - settings.offsetX - tooltip_width - 10; $(settings.tooltipTheme).not('.tooltip-kill').data('arrow-reposition', 'right'); } } } if (settings.followMouse == true) { var tooltip_width = $(settings.tooltipTheme).not('.tooltip-kill').outerWidth(false); var tooltip_height = $(settings.tooltipTheme).not('.tooltip-kill').outerHeight(false); var tooltip_content = $(settings.tooltipTheme).not('.tooltip-kill').find('.tooltip-message-content').html(); $(this).mousemove(function(e){ $(settings.tooltipTheme).not('.tooltip-kill').find('.tooltip-message-content').html('').html(tooltip_content); var tooltip_height = $(settings.tooltipTheme).not('.tooltip-kill').outerHeight(false); if(settings.position == 'top') { $(settings.tooltipTheme).not('.tooltip-kill').css({ 'left': ((e.pageX - 1) - (tooltip_width / 2) + settings.offsetX) + 'px', 'top': ((e.pageY - tooltip_height - 2) - settings.offsetY - 10) + 'px' }); } if(settings.position == 'top-right') { $(settings.tooltipTheme).not('.tooltip-kill').css({ 'left': e.pageX - 8 + settings.offsetX + 'px', 'top': ((e.pageY - tooltip_height - 2) - settings.offsetY - 10) + 'px' }); } if(settings.position == 'top-left') { $(settings.tooltipTheme).not('.tooltip-kill').css({ 'left': (e.pageX - tooltip_width + settings.offsetX) + 7 + 'px', 'top': ((e.pageY - tooltip_height - 2) - settings.offsetY - 10) + 'px' }); } if(settings.position == 'bottom') { $(settings.tooltipTheme).not('.tooltip-kill').css({ 'left': (e.pageX - (tooltip_width / 2) + settings.offsetX - 1) + 'px', 'top': (e.pageY + 15 + settings.offsetY + 10) + 'px' }); } if(settings.position == 'bottom-right') { $(settings.tooltipTheme).not('.tooltip-kill').css({ 'left': e.pageX - 2 + settings.offsetX + 'px', 'top': (e.pageY + 15 + settings.offsetY + 10) + 'px' }); } if(settings.position == 'bottom-left') { $(settings.tooltipTheme).not('.tooltip-kill').css({ 'left': (e.pageX - tooltip_width + settings.offsetX) + 12 + 'px', 'top': (e.pageY + 15 + settings.offsetY + 10) + 'px' }); } }); } if (settings.arrow == true){ var arrow_class = 'tooltip-arrow-' + settings.position; if (settings.followMouse == true) { if(arrow_class.search('right') > 0) { var temp_arrow_class = arrow_class; arrow_class = temp_arrow_class.replace('right', 'left'); } else { var temp_arrow_class = arrow_class; arrow_class = temp_arrow_class.replace('left', 'right'); } } if(arrow_class == 'tooltip-arrow-right') { var arrow_type = '◀'; var arrow_vertical = 'top:' + ((tooltip_height / 2) - 5) + 'px'; } if(arrow_class == 'tooltip-arrow-left') { var arrow_type = '▶'; var arrow_vertical = 'top:' + ((tooltip_height / 2) - 4) + 'px'; } if(arrow_class.search('top') > 0) { var arrow_type = '▼'; } if(arrow_class.search('bottom') > 0) { var arrow_type = '▲'; } if(settings.arrowColor.length < 1) { var arrow_color = $(settings.tooltipTheme).not('.tooltip-kill').css('background-color'); } else { var arrow_color = settings.arrowColor; } var arrow_reposition = $(settings.tooltipTheme).not('.tooltip-kill').data('arrow-reposition'); if (!arrow_reposition) { arrow_reposition = ''; } else if (arrow_reposition == 'left') { arrow_class = 'tooltip-arrow-right'; arrow_type = '◀'; arrow_reposition = ''; } else if (arrow_reposition == 'right') { arrow_class = 'tooltip-arrow-left'; arrow_type = '▶'; arrow_reposition = ''; } else { arrow_reposition = 'left:'+ arrow_reposition +'px;'; } var arrow = '<div class="'+ arrow_class +' tooltip-arrow" style="color:'+ arrow_color +'; width:'+ tooltip_width +'px; display:none; '+ arrow_reposition +' '+ arrow_vertical +'">'+ arrow_type +'</div>'; } else { var arrow = ''; } $(settings.tooltipTheme).not('.tooltip-kill').css({'top': my_top+'px', 'left': my_left+'px'}).append(arrow); if(settings.animation == 'slide') { $(settings.tooltipTheme).not('.tooltip-kill').delay(settings.delay).slideDown(settings.speed, function() { $('.tooltip-arrow').fadeIn(settings.speed); }); if(settings.timer > 0) { $(settings.tooltipTheme).not('.tooltip-kill').delay(settings.timer).slideUp(settings.speed); } } else { $('.tooltip-arrow').show(); $(settings.tooltipTheme).not('.tooltip-kill').delay(settings.delay).fadeIn(settings.speed); if(settings.timer > 0) { $(settings.tooltipTheme).not('.tooltip-kill').delay(settings.timer).fadeOut(settings.speed); } } }, function() { $(settings.tooltipTheme).not('.tooltip-kill').clearQueue(); tooltip_text = $(this).data('title'); $(this).attr('title', tooltip_text); $(settings.tooltipTheme).addClass('tooltip-kill'); animateOut('.tooltip-kill'); }); } })( jQuery ); $(document).ready(function() { $('.tpt').tooltipster({fixedWidth: 200,position: 'top'}); $('.tpb').tooltipster({fixedWidth: 200,position: 'bottom'}); $('.tpl').tooltipster({fixedWidth: 200,position: 'left'}); $('.tpr').tooltipster({fixedWidth: 200,position: 'right'}); $('.tptl').tooltipster({fixedWidth: 200,position: 'top-left'}); $('.tptr').tooltipster({fixedWidth: 200,position: 'top-right'}); $('.tpbl').tooltipster({fixedWidth: 200,position: 'bottom-left'}); $('.tpbr').tooltipster({fixedWidth: 200,position: 'bottom-right'}); }); });//]]> </script>
    4Now , lets test it.
    Paste this anywhere in your blog or website's source code.
     <a class='tpb' title='my awesome tooltip'>Tooltip</a>
    
     (Please note that if you are using original tooltipster Code for this,then the classes always be 'tooltip',and if you are using script above,then it can be tpt,tpb,tpl,tpr,tptl,tptr,tpbl,tpbr- as you can specify the direction of the tooltip )
     If everything works ,please be kind to tell it in comments, else start a discussion and find your solution.
     Or you can go to tooltipster's project page and follow their instructions. they have made an easy guide for beginners
    http://calebjacob.com/tooltipster/#getting-started

    Read Article →

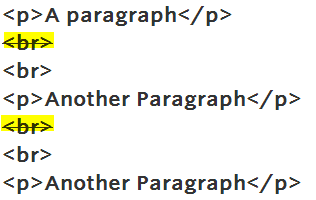
    How to remove <br> tag from two <br> tags using jQuery


    Here is a nice solution for those who want to remove one tag from where two tags comes together.


    <p>A paragraph</p>
    <br>
    <br>
    <p>Another Paragraph</p>
    <br>
    <br>
    <p>Another Paragraph</p>


    So, if you have used blogger to post something, you may have noticed that when we click enter, it automatically interpreted as a tag.
    :I have felt this problem in my blog too:

    So the basic selector syntax using jQuery is

    jQuery('document').ready(function() {
    $( ' br + br').remove();
    }

    If you want ot remove one tag only within <pre> tags, then it comes like this

    jQuery('document').ready(function() {
    $( 'pre br + br').remove();
    }

    After loading the page, above example will converted to


    <p>A paragraph</p>
    <br>
    <p>Another Paragraph</p>
    <br>
    <p>Another Paragraph</p>


    Here is the final solution for those who want to remove All doubled tags.


    jQuery('document').ready(function() {
     $( 'br + br').remove();
     }


    And here is the solution for those who want to remove All doubled tags only within <pre> tags.


    jQuery('document').ready(function() {
    $( 'br + br').remove();
    }


    Below is other ways with jQuery. These will work. but above solution is recommended!

    $('br').next('br').remove();
    $('br').prev('br').remove();


      Read Article →

      How to Enable/Disable default lightbox for images in blogger

      Here is how you can enable or disable blogger's default lightbox plugin on your blog.
      If you need more advanced controls, you will have to disable it and search for any other Lightbox plugin like jQuery Pretty photo plugin.

      So, if you want to enable light box for blogger images, then
      Go to blogger dashboard by signing in to your blogger.com account.

      Select your blog to enable or disable Default light box.
      Click on options, Select Settings
      It will open up settings tab for selected blog.

      In settings -> select Posts and comments option


      in sub menu -> you can see An option > showcase images with light box.


      To enable light box, select Yes from drop-down menu,


      if you are using any other plugin to showcase images, then
      Select NO from drop down.


      Note: If you are using any other light box plugin, then it is better to disable default light box in blogger else it will cause problems with your template.

      Hope this helps you!:)

      Read Article →

      HTTP to HTTPS For images with jQuery or by Leaving protocol


      You have a domain in https://www.example.com, and it contains large number of images but image sources are starting from http:// .   Example: http://www.example.com/image.jpg.

      Problem you are facing is, When you open your website with https://www.example.com , this will show ssl warning in browser that you are attempting to access non-secure contents from your secure website.

      To prevent this problem, there are Three Choices.

      • Manually add "https://" instead of all "http://" in all image sources.

      • Without defining protocol information, http:// or https:// in image source, instead leave the protocol information by just adding "//" instead of "http://" and  "https://"

      • Use a Program that converts all images src to start from https:// instead of http://


      In first method, it might take time.

      Best solution here is Second Method! that you leave any protocol information.
      For example
      instead of  <img src='http://www.example.com/image.jpg'/>
      Use   <img src='//www.example.com/image.jpg'/>
      So it will automatically inherit protocol from website address.The browser will use whatever the current protocol is.
      If you are visiting http://www.example.com then image source will also be http://
      And if you are visiting https://www.example.com ,thenimage source will also be https://


      Third method is something that i wont suggest you to do because it might effect page load time and will be requesting two times to the server for one image object. one for htt and other for https.
      even if it is so, it will be good if you know how to do that with a simple jQuery Plugin.
      This simple jQuery plugin that replace all http:// in image source to https:// when the document is ready.

      insert this script just before your </body> tag.
      It needs jQuery to work. So don't be panic trying this without a working jQuery called to your page first.

      <script type='text'/JavaScript>
      $(document).ready(function() {
        $("img").each(function() {
          var i = $(this).attr("src");
          var n = i.replace("http://", "https://");
          $(this).attr("src", function() {
            return n
          })
        })
      });
      </script>


      Read Article →

      How to add a class to any element using jQuery or JavaScript


      If you are a good web designer, you will always think of how to automate things without wasting our valuable time.
      This is one of the question every web designer/web developer thinks of. how to automate things!

      Here we will discuss about how to add classes to elements automatically on page load.
      lets have a look at what are the benefits of assigning classes automatically.

      • Spend no time to add all classes by hand
      • Accuracy
      • Faster Page loads

      jQuery's Basic syntax to add class is 
      $("elementID").addClass("ClassName")
      To use jQuery,you will have to add jQuery library between your<head></head> tags.
      If you have not yet included jQuery in your webpages, its the time to do that. dont be afraid that the size of jQuery Script will affect your pageloading time,because it is less than 100 kb if minimized.(Smaller than a normal image i would say). 
      To Call jQuery, find </head> tag in your code.then Copy and paste the below code just before that </head> tag.
      <script src='//code.jquery.com/jquery-1.8.0.min.js' type='text/javascript'></script>

      How to add a class to all "img" tags at a time using jQuery or JavaScript

      Imagine that you have  many images in your website or blog.
      and you want to automate the process of adding a class called "my-sample-class-for-all-img-tags" to all <img>  tags inside the document.

      Add below code just before closing body tag (</body>).

      jQuery Script for adding a class to all "img" tag in document:

      <script type='text/JavaScript'>
      jQuery('document').ready(function(){
      $("img").addClass("my-sample-class-for-all-img-tags");
      });
      </script>

      JavaScript Code for adding a class to all "img" tag in document :

      <script type='text/JavaScript'>
      var images = document.getElementsByTagName("img");
      var i;
      for(i = 0; i < images.length; i++) {
          images[i].className += " my-sample-class-for-all-img-tags";
      }
      </script>

      Save,and you are done.
      Next time when you refresh the output page, a class named "my-sample-class-for-all-img-tags" will be added to all img tags inside the webpage.

      How to add a class to all pre tags at a time using jQuery or JavaScript

      Imagine that you have  many pre tags in your website or blog.
      and you want to automate the process of adding a class called "my-sample-class-for-all-pre-tags" to all <pre>  tags inside the document.

      Add below code just before closing body tag (</body>).

      jQuery Script for adding a class to all "pre" tag in document:

      <script type='text/JavaScript'>
      jQuery('document').ready(function(){
      $("pre").addClass("my-sample-class-for-all-pre-tags");
      });
      </script>

      JavaScript Code for adding a class to all "pre" tag in document :

      <script type='text/JavaScript'>
      var pres = document.getElementsByTagName("pre");
      var i;
      for(i = 0; i < pres.length; i++) {
          pres[i].className += " my-sample-class-for-all-pre-tags";
      }
      </script>

      Save,and you are done.
      Next time when you refresh the output page, a class named "my-sample-class-for-all-pre-tags" will be added to all pre tags inside the webpage.


      How to add a class to all code tags at a time using jQuery or JavaScript

      Imagine that you have  many <code> tags in your website or blog.
      and you want to automate the process of adding a class called "my-sample-class-for-all-code-tags" to all <code>  tags inside the document.

      Add below code just before closing body tag (</body>).

      jQuery Script for adding a class to all "code" tag in document:

      <script type='text/JavaScript'>
      jQuery('document').ready(function(){
      $("code").addClass("my-sample-class-for-all-code-tags");
      });
      </script>

      JavaScript Code for adding a class to all "img" tag in document :

      <script type='text/JavaScript'>
      var codes = document.getElementsByTagName("code");
      var i;
      for(i = 0; i < codes.length; i++) {
          codes[i].className += " my-sample-class-for-all-code-tags";
      }
      </script>

      Save,and you are done.
      Next time when you refresh the output page, a class named "my-sample-class-for-all-code-tags" will be added to all <code> tags inside the webpage.


      How to add a class to all div tags at a time using jQuery or JavaScript

      If you want to automate the process of adding a class called "my-sample-class-for-all-div-tags" to all <div>  tags inside the document.

      Add below code just before closing body tag (</body>).

      jQuery Script for adding a class to all "img" tag in document:

      <script type='text/JavaScript'>
      jQuery('document').ready(function(){
      $("div").addClass("my-sample-class-for-all-div-tags");
      });
      </script>

      JavaScript Code for adding a class to all "div" tag in document :

      <script type='text/JavaScript'>
      var divs = document.getElementsByTagName("div");
      var i;
      for(i = 0; i < divs.length; i++) {
          divs[i].className += " my-sample-class-for-all-div-tags";
      }
      </script>

      Save,and you are done.
      Next time when you refresh the output page, a class named "my-sample-class-for-all-div-tags" will be added to all div tags inside the webpage.

      How to add a class to all button tags at a time using jQuery or JavaScript

      Imagine that you have  <button> tags in your website or blog.
      and you want to automate the process of adding a class called "my-sample-class-for-all-button-tags" to all <button>  tags inside the document.

      Add below code just before closing body tag (</body>).

      jQuery Script for adding a class to all "img" tag in document:

      <script type='text/JavaScript'>
      jQuery('document').ready(function(){
      $("button").addClass("my-sample-class-for-all-button-tags");
      });
      </script>

      JavaScript Code for adding a class to all "img" tag in document :

      <script type='text/JavaScript'>
      var buttons = document.getElementsByTagName("button");
      var i;
      for(i = 0; i < buttons.length; i++) {
          buttons[i].className += " my-sample-class-for-all-button-tags";
      }
      </script>

      Save,and you are done.
      Next time when you refresh the output page, a class named "my-sample-class-for-all-button-tags" will be added to all <button> tags inside the webpage.

      How to add a class to all input tags at a time using jQuery or JavaScript

      Imagine that you have  <input> tags in your website or blog.
      and you want to automate the process of adding a class called "my-sample-class-for-all-input-tags" to all <input>  tags inside the document.

      Add below code just before closing body tag (</body>).

      jQuery Script for adding a class to all "input" tag in document:

      <script type='text/JavaScript'>
      jQuery('document').ready(function(){
      $("input").addClass("my-sample-class-for-all-input-tags");
      });
      </script>

      JavaScript Code for adding a class to all "input" tag in document :

      <script type='text/JavaScript'>
      var inputs = document.getElementsByTagName("input");
      var i;
      for(i = 0; i < inputs.length; i++) {
          inputs[i].className += " my-sample-class-for-all-input-tags";
      }
      </script>

      Save,and you are done.
      Next time when you refresh the output page, a class named "my-sample-class-for-all-input-tags" will be added to all <input> tags inside the webpage.

      How to add a class to all textarea tags at a time using jQuery or JavaScript

      Imagine that you have  <textarea> tags in your website or blog.
      and you want to automate the process of adding a class called "my-sample-class-for-all-textarea-tags" to all <textarea>  tags inside the document.

      Add below code just before closing body tag (</body>).

      jQuery Script for adding a class to all "textarea" tag in document:

      <script type='text/JavaScript'>
      jQuery('document').ready(function(){
      $("textarea").addClass("my-sample-class-for-all-textarea-tags");
      });
      </script>

      JavaScript Code for adding a class to all "textarea" tag in document :

      <script type='text/JavaScript'>
      var textareas = document.getElementsByTagName("textarea");
      var i;
      for(i = 0; i < textareas.length; i++) {
          textareas[i].className += " my-sample-class-for-all-textarea-tags";
      }
      </script>

      Save,and you are done.
      Next time when you refresh the output page, a class named "my-sample-class-for-all-textarea-tags" will be added to all <textarea> tags inside the webpage.

      How to add a class to all span tags at a time using jQuery or JavaScript

      Imagine that you have  <span> tags used in your website or blog.
      and you want to automate the process of adding a class called "my-sample-class-for-all-span-tags" to all <span>  tags inside the document.

      Add below code just before closing body tag (</body>).

      jQuery Script for adding a class to all "span" tag in document:

      <script type='text/JavaScript'>
      jQuery('document').ready(function(){
      $("span").addClass("my-sample-class-for-all-span-tags");
      });
      </script>

      JavaScript Code for adding a class to all "span" tag in document :

      <script type='text/JavaScript'>
      var spans = document.getElementsByTagName("span");
      var i;
      for(i = 0; i < spans.length; i++) {
          spans[i].className += " my-sample-class-for-all-span-tags";
      }
      </script>

      Save,and you are done.
      Next time when you refresh the output page, a class named "my-sample-class-for-all-span-tags" will be added to all Span tags inside the webpage.

      How to add a class to html tag on page load using jQuery or JavaScript

      If you want to add a class to your <html> tag on pageload,Add below code just before closing body tag (</body>).

      jQuery Script for adding a class to "html" tag

      <script type='text/JavaScript'>
      jQuery('document').ready(function(){
      $("html").addClass("my-sample-class-for-html-tag");
      });
      </script>

      JavaScript Code for adding a class to "html" tag

      <script type='text/JavaScript'>
      var htmltag = document.getElementsByTagName("html");
      htmltag[0].className += " my-sample-class-for-html-tag";
      </script>

      Save,and you are done.
      Next time when you refresh the output page, a class named "my-sample-class-for-html-tag" will be added to <html> tag.

      How to add a class to body tag on page load using jQuery or JavaScript

      If you want to add a class to your <body> tag on pageload,Add below code just before closing body tag (</body>).

      jQuery Script for adding a class to "body" tag

      <script type='text/JavaScript'>
      jQuery('document').ready(function(){
      $("body").addClass("my-sample-class-for-body-tag");
      });
      </script>

      JavaScript Code for adding a class to "body" tag 

      <script type='text/JavaScript'>
      var bodytag = document.getElementsByTagName("body");
      bodytag[0].className += " my-sample-class-for-body-tag";
      </script>

      Save,and you are done.
      Next time when you refresh the output page, a class named "my-sample-class-for-body-tag" will be added to <body> tag.

      How to add a class to an element with specific class on page load using jQuery or JavaScript

      If you want to add a class to an element with specific class on pageload,Add below code just before closing body tag (</body>).

      jQuery Script for adding a class to an element with specifc class.

      <script type='text/JavaScript'>
      jQuery('document').ready(function(){
      $(".existing-class-name").addClass("my-sample-class-for-element-with-a-class-of-existing-class-name");
      });
      </script>

      JavaScript Code for adding a class to an element with specifc class.

      <script type='text/JavaScript'>
      var classes = document.getElementsByClassName("existing-class-name-to-find");
      var i;
      for(i = 0; i < classes.length; i++) {
          classes[i].className += " my-sample-class-for-all-elements-with-class-of-existing-class-name-to-find";
      }
      </script>

      Save,and you are done.
      Next time when you refresh the output page, a class named "my-sample-class-for-all-elements-with-class-of-existing-class-name-to-find" will be added to all elements which was having a "existing-class-name-to-find" class.


      Important Notes:

      • Dont forget to include jQuery library before you experiment with jquery sample codes above,a small description on how to add jQuery to your page is explained in the beginning of this article.
      • Dont forget to replace class names and tags with your own classnames which you used in your blog or website.

      Press ctrl+D to bookmark and Please leave your comments and thoughts below :)


      Read Article →

      Simple Tutorial: Add Prettyphoto to Blog/Website


      You might have seen prettyPhoto plugin effects.
      Because i needed some lightweight solution that help user to get rid off opening the image as in a new window and to come back to image containing page, they have to hit backspace or back button.
      This Solution worked fine, user doesnot need to navigate from the page and can see the large image in a wraped box that too fixed and beautiful.

      If you havent seen this yet, Click on any images in my posts.

      To add this to your blog or website, you will have to follow simple steps below.

      In your template or page's source code, find </head>  (Press Ctrl+F and Search this).
      Add below lines just before that </head>  tag.

      <script src='http://ajax.googleapis.com/ajax/libs/jquery/1.8.0/jquery.min.js' type='text/javascript'></script>
      <script src='http://aslamise.googlecode.com/files/prettyPhoto.js' type='text/javascript'></script>
      <link href='http://cdn.jsdelivr.net/prettyphoto/3.1.5/css/prettyPhoto.css' media='screen' rel='stylesheet' type='text/css'/>


      If there is jQuery already called in your page or template, then remove first line of the above code.
      So it will be

      <script src='http://aslamise.googlecode.com/files/prettyPhoto.js' type='text/javascript'/></script>
      <link href='http://cdn.jsdelivr.net/prettyphoto/3.1.5/css/prettyPhoto.css' media='screen' rel='stylesheet' type='text/css'/>


      Now, Find the </body> tag in your page.
      Then Insert this script just before that tag.

      <script charset='utf-8' type='text/javascript'>
       jQuery(document).ready(function($) {
      $('a > img').parent().attr('rel', 'prettyPhoto');
       });
      jQuery("body").on("click", "a[rel^='prettyPhoto']", function() {
          jQuery.prettyPhoto.open(jQuery(this).attr("href"),"","");
          return false;
      })
      </script>

      The above script says the browser to add a "rel='prettyPhoto()'" attribute to the parent <a> tag where there is an <img > tag available.
      For example
      I have this code which shows an image ,and if we click on it ,it will guide you to the Fullsize image.
      To know how to easily call the thumbnail of blogger hosted image, use search box.

      <a href="https://blogger.googleusercontent.com/img/b/R29vZ2xl/AVvXsEjlzwh8_uDtK3JneMECI8NZeqldOQKbV3EHSh_0kBk0ycY9wXUFJBKs31t0wUrETDI2vrRMuk96yFABGf-Wxj-9QP1n5AhLhkHkegB6kHq9BPew2TE8MnmLADAxJXn_Rz1klTZP52aKkuSk/s1600/Beautiful-Rose-Flowers-Pictures-And-Wallpapers74.j.jpg"><img src="https://blogger.googleusercontent.com/img/b/R29vZ2xl/AVvXsEjlzwh8_uDtK3JneMECI8NZeqldOQKbV3EHSh_0kBk0ycY9wXUFJBKs31t0wUrETDI2vrRMuk96yFABGf-Wxj-9QP1n5AhLhkHkegB6kHq9BPew2TE8MnmLADAxJXn_Rz1klTZP52aKkuSk/s320/Beautiful-Rose-Flowers-Pictures-And-Wallpapers74.j.jpg" width="246">
      
      </a>


      Thats the all code i have inserted from my side.
      now, after included this script, it will turn into this.

      <a href="https://blogger.googleusercontent.com/img/b/R29vZ2xl/AVvXsEjlzwh8_uDtK3JneMECI8NZeqldOQKbV3EHSh_0kBk0ycY9wXUFJBKs31t0wUrETDI2vrRMuk96yFABGf-Wxj-9QP1n5AhLhkHkegB6kHq9BPew2TE8MnmLADAxJXn_Rz1klTZP52aKkuSk/s1600/Beautiful-Rose-Flowers-Pictures-And-Wallpapers74.j.jpg" rel="prettyPhoto"> <img src="https://blogger.googleusercontent.com/img/b/R29vZ2xl/AVvXsEjlzwh8_uDtK3JneMECI8NZeqldOQKbV3EHSh_0kBk0ycY9wXUFJBKs31t0wUrETDI2vrRMuk96yFABGf-Wxj-9QP1n5AhLhkHkegB6kHq9BPew2TE8MnmLADAxJXn_Rz1klTZP52aKkuSk/s320/Beautiful-Rose-Flowers-Pictures-And-Wallpapers74.j.jpg" width="246"> </a>


      <a href='FULL-SIZE-IMAGE-URL'>
      
      <img src='THUMBNAIL-OF-THE-ABOVE-IMAGE'></img>
      
      </a>


      NOW,the last step.
      insert this code just after the above code.

      <script charset='utf-8' type='text/javascript'>
      jQuery(document).ready(function(){
      jQuery("a[rel^='prettyPhoto'], a[rel^='lightbox']").prettyPhoto({
      theme: 'dark_rounded', /* light_rounded / dark_rounded / light_square / dark_square / facebook */
      animation_speed: 'fast', /* fast/slow/normal */
      slideshow: 5000, /* false OR interval time in ms */
      autoplay_slideshow: false, /* true/false */
      opacity: 0.80, /* Value between 0 and 1 */
      show_title: true, /* true/false */
      allow_resize: true, /* Resize the photos bigger than viewport. true/false */
      default_width: 500,
      default_height: 344,
      counter_separator_label: '/', /* The separator for the gallery counter 1 "of" 2 */
      horizontal_padding: 20, /* The padding on each side of the picture */
      hideflash: false, /* Hides all the flash object on a page, set to TRUE if flash appears over prettyPhoto */
      wmode: 'opaque', /* Set the flash wmode attribute */
      autoplay: true, /* Automatically start videos: True/False */
      modal: false, /* If set to true, only the close button will close the window */
      deeplinking: true, /* Allow prettyPhoto to update the url to enable deeplinking. */
      overlay_gallery: true, /* If set to true, a gallery will overlay the fullscreen image on mouse over */
      keyboard_shortcuts: true, /* Set to false if you open forms inside prettyPhoto */
      changepicturecallback: function(){}, /* Called everytime an item is shown/changed */
      callback: function(){}, /* Called when prettyPhoto is closed */
      ie6_fallback: true
      });
      jQuery(".toggle_content").hide();
      });
      </script>


      Thats All.. you have successfully set up prettyphoto.

      To know more about Configuring and making the prettyPhoto more beautiful, please continue reading.
      The last code block is where you can configure the prettyPhoto display and functions

      • theme

      you can change theme of prettyphoto gallery with this option.
      In above version, there are 6 themes available.
      1. pp_default 
      2. light_rounded
      3. dark_rounded
      4. light_square
      5. dark_square
      6. facebook
      1. pp_default - default theme if you have not set any.
      2. light_rounded - This PrettyPhoto theme comes up with a light rounded gallery which holds the picture. to set it as default, Simply Call it in the configuration as   theme: 'light_rounded'
      3. dark_rounded - This PrettyPhoto theme comes up with a Dark rounded gallery which holds the picture. to set it as default, Simply Call it in the configuration as   theme: 'dark_rounded'
      4. light_square - This PrettyPhoto theme comes up with a light square gallery which holds the picture. to set it as default, Simply Call it in the configuration as   theme: 'light_square'
      5. dark_square - This PrettyPhoto theme comes up with a dark square gallery which holds the picture. to set it as default, Simply Call it in the configuration as   theme: 'dark_square' 
      6. facebook - This PrettyPhoto theme comes up with old facebook like gallery which holds the picture. to set it as default, Simply Call it in the configuration as   theme: 'facebook'

      • animation_speed

      This is the option to control the speed of prettyphoto animation effect. there are 3 options available.
      1. fast - When this Animation speed control option is set, animation will be fast.
      2. slow - When this Animation speed control option is set, animation will be slow.
      3. normal - When this Animation speed control option is set, animation will be normal.

      • slideshow

      If you want to enable or disable slideshow of the images in page,this option will be useful
      1. false - Set to false if you don't want to allow slideshow.
      2. interval time in ms - if you want to enable slideshow, type the value of interval time in milliseconds. for example, 5000.

      • autoplay_slideshow

      This is where you can control whether the slideshow to be auto-played or not.
      1. true - If you want to auto play the slideshow without user clicking on slideshow, just enable it by setting the value to true.
      2. false - Else if you don't want o play slideshow automatically,then set the option to false

      • opacity

      Use this option to set the opacity of background,where our prettyphoto pops up.
      1. Value between 0 and 1 - example : 0.8

      • show_title

      With this prettyphoto configuration option, you can hide or show the title content of the image .
      1. true
      2. false

      • allow_resize

      Resize the photos bigger than viewport,If you want to allow resizing the prettyphoto opened window, set it as true, else,t o to false.
      1. true
      2. false

      • default_width

       defaultwidth of the prettyphoto gallery

      • default_height

      default height of prettyphoto gallery

      • counter_separator_label

      Use this option  for changing  the separator for the gallery counter 1 "of" 2. example : /  or \ or | 

      • horizontal_padding

      The padding on each side of the picture

      • hideflash

      Hides all the flash object on a page, set to TRUE if flash appears over prettyPhoto

      • wmode

      Set the flash wmode attribute

      • autoplay

      Automatically start videos: True/False 

      • modal

      If set to true, only the close button will close the window

      • deeplinking

      Allow prettyPhoto to update the url to enable deeplinking.

      • overlay_gallery

      If set to true, a gallery will overlay the fullscreen image on mouse over

      • keyboard_shortcuts

      Set to false if you open forms inside prettyPhoto

      • changepicturecallback

      Called everytime an item is shown/changed 

      • callback

       Called when prettyPhoto is closed

      Thats the all option you can change.Please dont change anything if you dont know what you are doing, and if any help needed, ask in comments.

      Extras


      If you want to enable lightbox only inside specific divs , then

      Change This
      $('a > img').parent().attr('rel', 'prettyPhoto');
      TO
      $('.class-name a > img').parent().attr('rel', 'prettyPhoto');

      Where .class-name is the name class of the div.
      If you want to add prettyphoto plugin inside only in blog POSTS,
      The code will be

      $('.post-body a > img').parent().attr('rel', 'prettyPhoto');


      If you are experiencing problems Please view a working example here  ->

      http://jsfiddle.net/Aslamise/gXkDu/

      Read Article →

      Darken An Image With CSS, JavaScript Or Jquery!

      Assume you have an image in your web page and you want that to get darken when moue enter over that image.

      What You will do?

      • Using Inline Css ans inline Javascript,you can darken an image.
      • Also,if  you want to do that with a fade effect, you can use Css and it will work in modern browsers,
      • To work in all major browsers, you can use jquery.

      Here is the 3 ways to darken an image

      1. With Simple Inline Javascript + Css
      2. With Only Css.
      3. With the help of Jquery (It is the best) .

      Simplest Effect With Inline CSS and JavaScript
      Mouse Over and Opacity Will Change with inline CSS and JavaScript
      
      <a class="darken" href="http://google.com/" style="background: black; display: inline-block; padding: 0;">
      <img alt="Mouse Over and Opacity Will Change with inline CSS and JavaScript" onmouseout="this.style.opacity=1;" onmouseover="this.style.opacity=0.6;" src="https://blogger.googleusercontent.com/img/b/R29vZ2xl/AVvXsEify_lGIWF48wrBM8WqYvkJ4qJhmR12TWFEkOEE_Rlusa0UdOlyR1jJjKmROn0G4HGjVRXc3FIXw4A7PFgy-52ix-cf8yIWYCFxzFfgjeVfDF8HoTXUfIzyi2Qq2p2qv-1Xmw2bd8Hr8I0z/s1600/darkenimage.jpg" style="display: block;" width="200" />
      </a>


      Effect with CSS only (Only works with modern browsers)

      
      <style>
      a.darkencss {
          display: inline-block;
          background: black;
          padding: 0;
      }
      a.darkencss img {
          display: block;
         
          -webkit-transition: all 0.5s linear;
             -moz-transition: all 0.5s linear;
              -ms-transition: all 0.5s linear;
               -o-transition: all 0.5s linear;
                  transition: all 0.5s linear;
      }
      a.darkencss:hover img {
          opacity: 0.7;
                 
      }
      </style>
      <a class="darkencss" href="http://google.com/">
          <img src="https://blogger.googleusercontent.com/img/b/R29vZ2xl/AVvXsEify_lGIWF48wrBM8WqYvkJ4qJhmR12TWFEkOEE_Rlusa0UdOlyR1jJjKmROn0G4HGjVRXc3FIXw4A7PFgy-52ix-cf8yIWYCFxzFfgjeVfDF8HoTXUfIzyi2Qq2p2qv-1Xmw2bd8Hr8I0z/s1600/darkenimage.jpg" width="200" />
      </a>
      
      
      Effect with jquery JavaScript.(Works in all commom browsers)
      
      <style>
      a.darkenjquery {
          display: inline-block;
          background: black;
          padding: 0;
      }
      a.darkenjquery img {
          display: block;
      }
      </style>>
      <script src="http://ajax.googleapis.com/ajax/libs/jquery/1.8.0/jquery.min.js" type="text/javascript"></script>
      <a class="darkenjquery" href="http://google.com/">
          <img src="https://blogger.googleusercontent.com/img/b/R29vZ2xl/AVvXsEify_lGIWF48wrBM8WqYvkJ4qJhmR12TWFEkOEE_Rlusa0UdOlyR1jJjKmROn0G4HGjVRXc3FIXw4A7PFgy-52ix-cf8yIWYCFxzFfgjeVfDF8HoTXUfIzyi2Qq2p2qv-1Xmw2bd8Hr8I0z/s1600/darkenimage.jpg" width="200" />
      </a>
      <script>
      $('.darkenjquery').hover(function() {
          $(this).find('img').fadeTo(500, 0.5);
      }, function() {
          $(this).find('img').fadeTo(500, 1);
      });
      </script>


      Read Article →

