Host Website In Google AppEngine
Published by Aslam

Its a good news that we can host our static website contents in google app engine, for free. With this feature, we will be getting 1 GB free Space per application(Subdomain). Actually google designed this for Applications hosting. and Now you are going to learn how to turn google app engine to a fast,static hosting solution.
Read Carefully and if you have any doubts, feel free to ask in comments.
This Tutorial has 5 sessions
1Installing Python27 in windows
2Installing Google App Engine in windows
3 Configuring GoogleAppEngine App And Local Files
4 Deploying Contents to google
5 Checking and Troubleshooting.
Please Note that i will be demonstrating steps of installation of google app engine and related tools for Windows Operating system.
if you are having other os than windows, please go to google developers.
https://developers.google.com/appengine/
1 Installing Python27 in windows
First you will need Python runtime, version 2.7.3,Newer Versions of python not yet supported with google app engine.
To download go to this URl and download.
http://www.python.org/download/releases/2.7.3/#id5
Or download with this direct link.
http://www.python.org/ftp/python/2.7.3/python-2.7.3.msi (15 Mb)
After Download Completed, goto Downloads folder and you can see a file like this.
Double Click on that file. Python 2.7.3 setup will start.
Select "install for all users" and click on next.

Select Destination Directory.
C:\ will be the default parent directory.
Click Next.

Customize Python 2.7.3.
Select the way you want feutures to be installed.
Leave it like this. and click next.

Now, it will start installation.
Dont Click on cancel as it will abort the installation!

After Completing installtion Click on finish.

Now , to check whether Python installed correctly,
Go to Start - all programs - Python 2.7 and click on IDLE(Python GUI) .

it will open python Shell.
Type "Copyright" or "credits"
and click ok.
if you want to test more,
here is a simple calculation.
Write a=1 , and hit Enter
Write b=2 ,and hit Enter
Write c=a+b ,and hit Enter
Write c ,and hit enter.
after this you can see the value of "c" is displayed.
everything works fine.
Close Python for now.

2 Installing Google App Engine in windows
Now you need to download google app engine for python.
https://developers.google.com/appengine/downloads
Here is the direct link for Appegine for windows
http://googleappengine.googlecode.com/files/GoogleAppEngine-1.7.3.msi (32 Mb)
After Download Complete, Go to download s folder, you can see a file like this. GoogleAppEngine-1.7.3
Double click on that file and it will open up Google AppEngine installer.
We have already installed python 2.7, so it will keep going, and will show. "python 2.5 found, all pre-requisities found".
If it shows some error, Go to previous sections and Check whether Python installed properly.and version is accuate.
Click on Next.

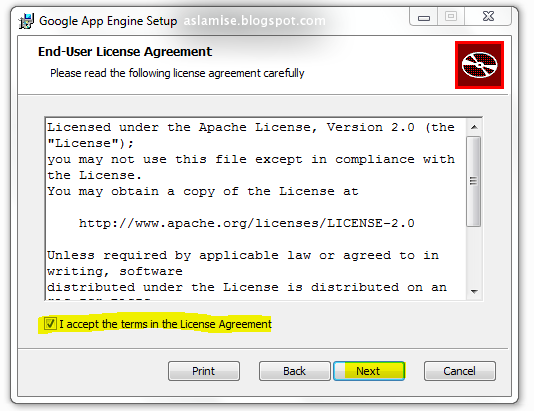
Read and Accept the Licence Agreement.
Click on Next.
Selct Desination Folder, Check 3 options.

Now Click on install

Dont Click Cancel as it will abort installation.

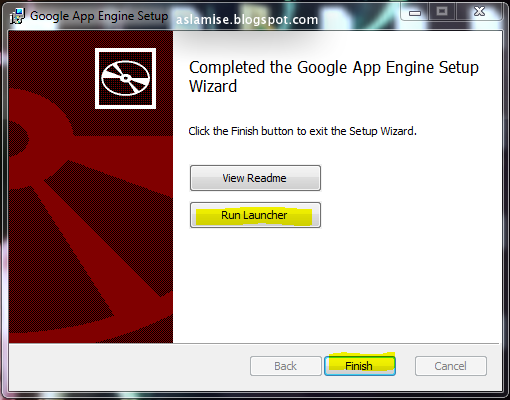
After Completing installation,Click on Launch then Finish.
After Applicatiom opened, Go to Edit - preferences.
Click on it.
It will open up Preferences Window.

Set Python path.
Python path is the location of Python programe where we installed .
In this case,it is C:\python27\pythonw.exe
If you have installed Google Appengine other than default location, you'llneed to change the
App Engine SDK path.
A path to the root of the app engine SDK
Example: "C:\program files\google\google_appengine"
Default if not set C:\program files\google\google_appengine.
If you have not changed the path, no need to mention it.
Next one is Editor path.
Default one is Wordpad.
Leave the last one as blank.

For now, Close app engine.
3 Configuring GoogleAppEngine App And Local Files
Open browser, and go to this address :https://appengine.google.com(Will open in a new tab).
Now we are going to register for an app engine account.
If you already have an account and set an application, skip this section


Now, We will need the application name we given(subdomain name), in this case, it's my-awesome subdomain.
Open Applauncher. you can see a shortcut to app engine application on your desktop

if you couldn't find this icon on desktop, don't worry, if its installed properly, go to start - All programs -google app engine it will open a folder where google app engine installed to. double click on google app launcher.bat file.
it will open google app engine application
Then create a folder in our computer-
In my local disk(J) - am creating a folder named "name anything you want".
It means you can create a directory in any name.and anywhere. it will be the parent folder for our subdomain workplace.


After this, click on the plus button, located on left bottom corner of app engine application.

then set it as follows

In application name field - type the name of subdomain you created, in this case, i am giving the subdomain's name i created "my-awesome-subdomain".
Next, select parent directory you created. am selecting the folder i created "name-anything-you-want" in my Local disk(J).
Port will be 8080
Double Check the information you entered. it will not be the same as in this screenshot.
Check application name and parent directory once again.

and click on create button.
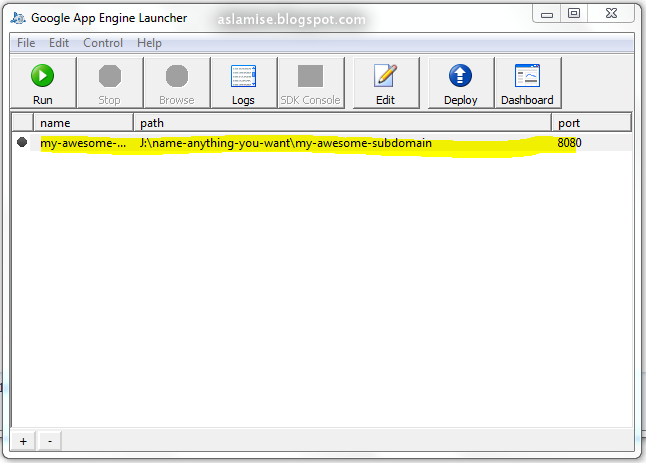
you have just configured one subdomain in google app engine launcher.
Now go to parent directory in your computer

There will be a subfolder created in name of our subdomain
Lets check whats inside

app.yaml //configuration file
favicon.ico //favicon Icon
index.yaml //index page
main.py //python script
Thats a simple python application - default template.This Default template demostrate that how to write a hello world on screen using python language.
You can test it using browse button on top of app launcher if you are curious about it.
LETS GET RID OF THIS!
Now what we need is not programing but a static hosting solution .right?
What important is.. app.yaml
This file determines what to upload.
we have to configure each and file extension and mime types to enable uploading.
Because we are going to create a static subdomain, we will have to store many things, pictures, videos,stylesheets,scripts ,and so on. so delete everything inside this folder, we are going to configure it for uploading static files.
For that Download this zip file.(Contains Configured App.yaml and an a folder named static.)
If you don't have unzip utility, you can get 7 zip application from here or download app.yaml from here.
Unzip the zip contents into that folder.
If you have Downloaded yaml script only, then paste it in that folder and create a folder named "static".
AND OPEN IT IN NOTEPAD OR WORDPAD
The first line will be
"application: my-awesome-subdomain"
Now change it to "application: your-subdomain-name"
Here your-subdomain-name refers to the subdomain/app you created just now.
Example: if you named "my-site" as your subdomain name, then Replace first line to ->
"application: my-site"
In static folder, there will be file named index.html. thats our main html page.
you can modify it later.

Now switch to google app engine launcher and click on Run

After clicking Run,it will show as this.

Now click on browse to see if it works fine or not.
if everything is ok, then it will open your browser and open the index page

click on stop button.
4 Deploying Contents to google
Now we are going to host our files. if you are ready and added something in static folder or it's subfolders,
Click on deploy icon on top bar of applauncher

it will ask for credentials, your email and password which you created your subdomain with.
if you use one email for creating subdomain and another one for deploying ,things will not work.
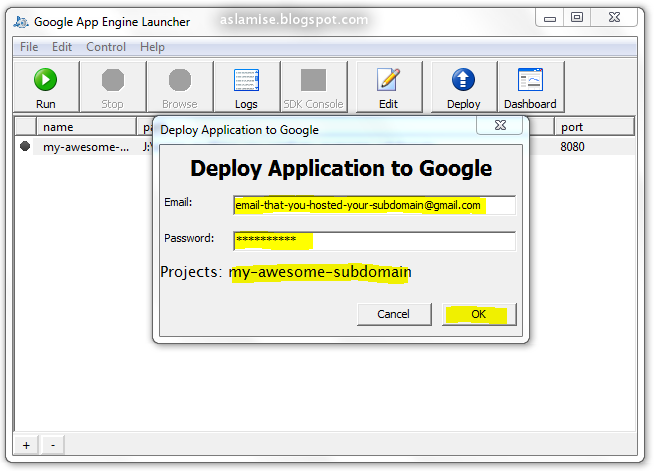
Email :your-email@gmail.com
Password: your-password
Project :it will already selected.and will be the subdomain name. in this case mine is
"my-awesome-subdomain".
Click on Ok
it will start deploying your files into google app engine.

After appearing the text, "You can close this window" in console, close the window and go to check whether your files uploaded or not.
in this case, i have to go to http://my-awesome-subdomain.appspot.com
5 Checking and Troubleshooting.
If everything worked well, it will show the contents of index.html file.
To test whether you are able to upload videos, copy a video and paste in static folder.
For example ,am copying "my-video.mp4" from my video's collection to a folder in
j://name-anything-you-want/my-awesome-subdomain/static/videos/
And to test, clicking on Run button in app engine application, then clicking browse and
going to localhost:8080/videos/my-video.mp4
if it downloading the video file, it worked fine, also check whether you have forgot to follow in above steps.
oh man............ thanks... u made it so simple !!!
ReplyDeleteThanks dude..
ReplyDelete